- 您现在的位置:买卖IC网 > PDF目录235918 > A3CJ-90B1-24EG PUSHBUTTON SWITCH, SPDT, ALTERNATE, 1A, 30VDC, PANEL MOUNT-THREADED PDF资料下载
参数资料
| 型号: | A3CJ-90B1-24EG |
| 元件分类: | 开关 |
| 英文描述: | PUSHBUTTON SWITCH, SPDT, ALTERNATE, 1A, 30VDC, PANEL MOUNT-THREADED |
| 文件页数: | 3/13页 |
| 文件大小: | 253K |
| 代理商: | A3CJ-90B1-24EG |
A3C
A3C
44
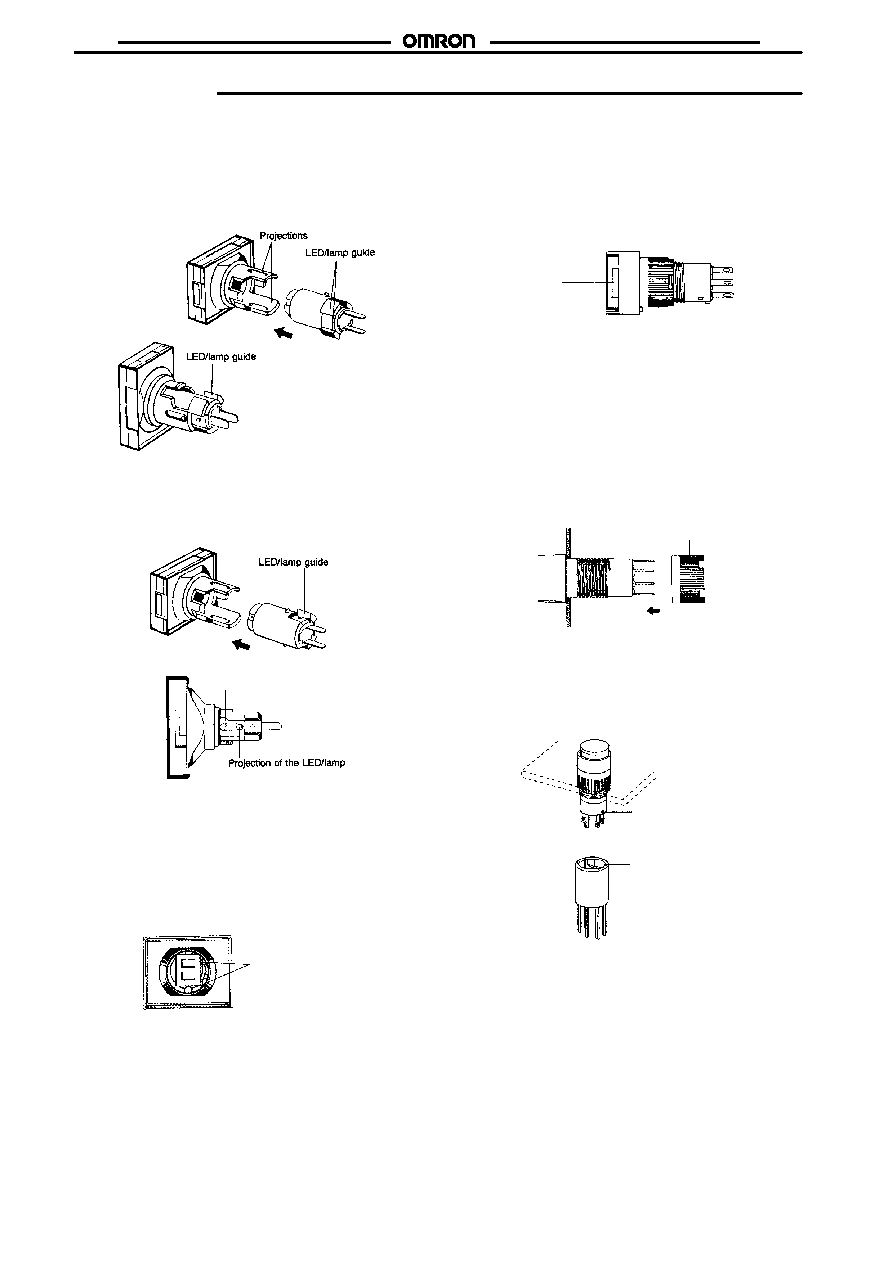
Installation
Mounting and Replacing the Pushbutton
Mounting Direction for the Pushbutton/Display and Lamp
Lighted Pushbutton Switch
Insert the Lamp (incandescent lamp or LED lamp) into the
Pushbutton so that the lamp guide fits into the wider gap
between the projections on the Pushbutton.
Indicator
With Indicators, the Lamp is inserted facing the opposite
direction (i.e., at 180
°) to that for Lighted Pushbutton
Switches.
Groove of the Display
Note:
1. Push the projections on the Lamp into the grooves on
the Pushbutton/Display.
2. The Lamp for Lighted Pushbutton Switches moves, but
the Lamp for Indicators is fixed.
Mounting Direction for the Pushbutton/Display and Switch
Insert the Pushbutton/Display into the Switch so that the lamp guide
is aligned with the non-projecting part of the Switch.
Apply a pressure between 9.8 and 24.5 N.
Projection of the Switch
Note:
1. The mounting direction for Indicators is 180
° to that for
Lighted Pushbutton Switches. Be sure to insert the Leg-
end Plate and other parts with the correct orientation.
2. If the terminals of the Lamp become bent, it may be
impossible to fit them into the lamp terminal holes.
Ensure that the terminals are straight when they are
inserted.
3. Take particular care about the mounting direction with
the round models (A3CT).
Removing the Pushbutton/Display
Hold the recessed portions on the cap of the Pushbutton and pull.
Recess
Note:
Do not use tools such as pliers to remove the Pushbutton as
this may damage the cap.
Panel Mounting
Insert the Switch from the front of the panel. Mount the mounting nut
from the terminal end of the Switch and tighten it.
There are projections on the terminal end of the Switch which may,
depending on the orientation, block the nut. In this case, turn the nut
until it is possible to mount it. Tighten the nut to a torque between
0.20 and 0.39 N
m.
If soldering is used, mount the mounting nut first. Lead wires and
mounds of solder may make it impossible to mount the nut after sol-
dering.
Panel
Mounting nut
Socket Mounting
After securing the Switch to the panel using the mounting nut, insert
the Socket into the Switch.
Align the positioning holes of the Socket with the projections of the
Switch before inserting the Socket.
Panel
Projection of the Switch
Positioning hole of the
Socket
相关PDF资料 |
PDF描述 |
|---|---|
| A10005MSMCGE | ROTARY SWITCH-12POSITIONS, SP12T, LATCHED, 0.35A, 125VDC, THROUGH HOLE-STRAIGHT |
| A10005RNCQE | ROTARY SWITCH-12POSITIONS, SP12T, LATCHED, 0.35A, 125VDC, THROUGH HOLE-STRAIGHT |
| A10005RSCGK | ROTARY SWITCH-12POSITIONS, SP12T, LATCHED, 0.35A, 125VDC, THROUGH HOLE-STRAIGHT |
| AV19810KMZQK/UL0 | PUSHBUTTON SWITCH, SPDT, MOMENTARY, PANEL MOUNT-THREADED |
| AV49401ZBE/UL6 | PUSHBUTTON SWITCH, SPST, ALTERNATE, PANEL MOUNT-THREADED |
相关代理商/技术参数 |
参数描述 |
|---|---|
| A3CJ90F0A | 制造商:Omron Corporation 功能描述:Switch Push Button N.O./N.C. SPDT Flush Rectangular Button 0.1A 125VAC 30VDC Alternate Contact Solder Panel Mount |
| A3CKA-1006G | 功能描述:IDC CABLE-AKN10A/ AE10G / APK10A RoHS:否 类别:电缆组件 >> 矩形 系列:- 标准包装:1 系列:- 连接器类型:插头至插头 位置数:30 行数:2 间距 - 连接器:0.100"(2.54mm) 间距 - 线缆:0.050"(1.27mm) 长度:1.50'(457.20mm) 特点:电极标记 颜色:多色,带状 屏蔽:无屏蔽 使用:- 电缆端接:IDC 触点表面涂层:金 触点涂层厚度:30µin(0.76µm) |
| A3CKA-1006M | 功能描述:IDC CABLE- AKN10A/ AE10M / APK10 RoHS:否 类别:电缆组件 >> 矩形 系列:- 标准包装:1 系列:- 连接器类型:插头至插头 位置数:30 行数:2 间距 - 连接器:0.100"(2.54mm) 间距 - 线缆:0.050"(1.27mm) 长度:1.50'(457.20mm) 特点:电极标记 颜色:多色,带状 屏蔽:无屏蔽 使用:- 电缆端接:IDC 触点表面涂层:金 触点涂层厚度:30µin(0.76µm) |
| A3CKA-1018G | 功能描述:IDC CABLE-AKN10A/ AE10G / APK10A RoHS:否 类别:电缆组件 >> 矩形 系列:- 标准包装:1 系列:- 连接器类型:插头至插头 位置数:30 行数:2 间距 - 连接器:0.100"(2.54mm) 间距 - 线缆:0.050"(1.27mm) 长度:1.50'(457.20mm) 特点:电极标记 颜色:多色,带状 屏蔽:无屏蔽 使用:- 电缆端接:IDC 触点表面涂层:金 触点涂层厚度:30µin(0.76µm) |
| A3CKA-1018M | 功能描述:IDC CABLE- AKN10A/ AE10M / APK10 RoHS:否 类别:电缆组件 >> 矩形 系列:- 标准包装:1 系列:- 连接器类型:插头至插头 位置数:30 行数:2 间距 - 连接器:0.100"(2.54mm) 间距 - 线缆:0.050"(1.27mm) 长度:1.50'(457.20mm) 特点:电极标记 颜色:多色,带状 屏蔽:无屏蔽 使用:- 电缆端接:IDC 触点表面涂层:金 触点涂层厚度:30µin(0.76µm) |
发布紧急采购,3分钟左右您将得到回复。