- 您现在的位置:买卖IC网 > PDF目录253936 > A7CN-106-1 THUMB/PUSHWHEEL SWITCH-1SWITCHES, BINARY CODED DECIMAL, 0.1A, 28VDC, THROUGH HOLE-STRAIGHT PDF资料下载
参数资料
| 型号: | A7CN-106-1 |
| 元件分类: | 开关 |
| 英文描述: | THUMB/PUSHWHEEL SWITCH-1SWITCHES, BINARY CODED DECIMAL, 0.1A, 28VDC, THROUGH HOLE-STRAIGHT |
| 文件页数: | 5/6页 |
| 文件大小: | 487K |
| 代理商: | A7CN-106-1 |
5
A7CN/A7CN-L
Safety Precautions
Refer to Precautions for Correct Use on in the Technical Guide for Thumbwheel Switches.
Environment
Do not use where gases are generated (ammonia, chlorine, sulfur
dioxide).
Although Switches are of nearly dust-proof construction, they are
not drip-proof, therefore do not use in areas subject to water or oil
exposure and do not operate with wet or oily hands.
Provide additional dust-proofing measures, such as using a dust-
proof cover, when using in sand-exposed areas.
Handling
The A7CN cannot be connected to the A7C.
The molded components of the Switch use polyacetal resin and
polycarbonate resin. It is recommended that alcohol is used to wipe
off dirt and smudges from the molded components. Take care to
prevent the alcohol from getting inside.
Do not use thinner or other solutions which might damage the resin.
When changing settings, do not touch the operating buttons if your
fingers are wet or there is oil or any other foreign substance on your
fingers.
Do not drop the individual Switches. Doing so may damage the
resin catch (for connecting) on the side of the Switch.
When separating Switches, use a screwdriver as shown in the
figure below; disconnect them by releasing the top and bottom
hooks. Be careful not to bend the hooks.
When connecting Switches, fit the mating parts together.
Do not push the (+) and (-) operating push-buttons at the same
time.
Models with PCB Terminals
Do not use excessive force in handling the Switches. In particular,
take care to avoid dropping them because the terminals might bend
or break.
Screw-mounting Models
Tighten mounting screws to a torque between 0.2 to 0.24 Nm, using
M2.6 screws. Use plain washers or spring washers together with the
screws.
Setting Numbers
Locking Type
Set with the setting button by raising it.
Return the button to its original position
after setting. It is then locked to prevent
rotation, and the set numbers will not
change accidentally.
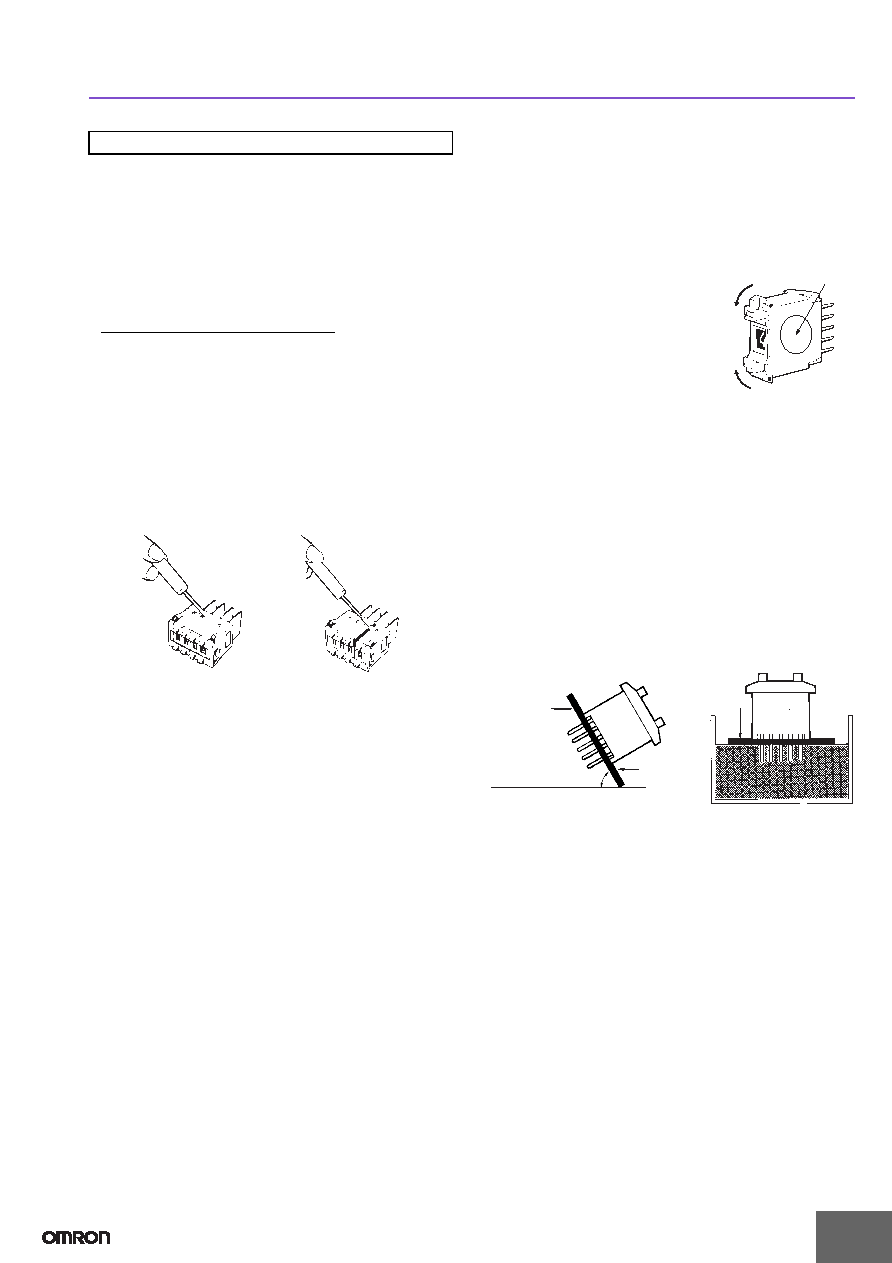
Soldering
Note the following points when soldering
printed circuit boards:
The terminal insertion holes on the PCB must be at least 1 mm in
diameter.
Automatic Soldering
Do not use dip cleaning. Doing so may result in flux penetration of
the Switch interior, causing contact and rotational defects. Clean
the flux as shown in Figure 1, tilting the Switch 80
° or less and using
a brush to apply the solvent only to the back of the board. It may
also be cleaned by dipping only the back of the board into the
solvent and then using a brush to clean.
Dip Soldering
When applying flux solvent, the dipping time is a maximum of 2
seconds. As shown in Figure 2, avoid flooding the top surface of the
printed circuit board with flux. Using a brush to apply flux further
reduces the danger of flux penetration. When cleaning flux with a
brush, tilt the Switch 80
° or less, as shown in Figure 1, in order to
prevent flux from flowing onto the switch mounting surface. Clean
flux as described above under Automatic Soldering.
Using a Soldering Iron
Use a 30-W soldering iron at a temperature of 350
°C for a
maximum of 3 seconds, and flush as described above.
Do not apply force to the terminals during soldering and for 3
minutes after soldering is completed. Doing so may result in
conduction or operation failure.
Ensure that soldering flux and alcohol do not penetrate into the
Switch interior
Precautions for Correct Use
Do not
push here
Top surface
of board
80
° or less
Back surface
of board
Wipe away flux
with a brush.
Figure 1
Figure 2
相关PDF资料 |
PDF描述 |
|---|---|
| AP4E400TZBE | PUSHBUTTON SWITCH, SPST, MOMENTARY, 0.2A, 24VDC, PANEL MOUNT-THREADED |
| AP4E502SZBE | PUSHBUTTON SWITCH, SPST, MOMENTARY, 0.2A, 24VDC, PANEL MOUNT |
| AP4E607SZBE | PUSHBUTTON SWITCH, SPST, MOMENTARY, 0.2A, 24VDC, PANEL MOUNT |
| AP4D507TZBE | PUSHBUTTON SWITCH, SPST, MOMENTARY, 0.2A, 24VDC, PANEL MOUNT-THREADED |
| AP4D407SWBE | PUSHBUTTON SWITCH, SPST, MOMENTARY, 0.2A, 24VDC, PANEL MOUNT |
相关代理商/技术参数 |
参数描述 |
|---|---|
| A7CN-106-2 | 制造商:OMRON Electronic Components LLC 功能描述: |
| A7CN1M1 | 制造商:Omron Electronic Components LLC 功能描述:SWIT ACCESS THUMB-PUSHWHEEL SWIT CAP - Bulk 制造商:OMRON INDUSTRIAL AUTOMATION 功能描述:Switch Access Thumbwheel Switch End Cap |
| A7CN-1M-1 | 功能描述:开关配件 BLACK A7CN END CAPS RoHS:否 制造商:C&K Components 类型:Cap 用于:Pushbutton Switches 设计目的: |
| A7CN-1M-1-LEFT | 制造商:OMRON Electronic Components LLC 功能描述: |
| A7CN1PA1 | 制造商:Omron Electronic Components LLC 功能描述:SWIT ACCESS THUMBWHEEL SWIT SPACER - Trays 制造商:Omron Electronic Components LLC 功能描述:SPACER BLACK FOR BACK MNT A7CN 制造商:OMRON INDUSTRIAL AUTOMATION 功能描述:Switch Access Thumbwheel Switch Spacer |
发布紧急采购,3分钟左右您将得到回复。