- 您现在的位置:买卖IC网 > PDF目录19042 > 10961 (3M)MDR CUTTING UNIT PDF资料下载
参数资料
| 型号: | 10961 |
| 厂商: | 3M |
| 文件页数: | 2/6页 |
| 文件大小: | 0K |
| 描述: | MDR CUTTING UNIT |
| 标准包装: | 1 |
| 系列: | MDR |
| 附件类型: | 切割单位 |
| 其它名称: | 90169008567 JE150172870 |
�� �
�
�6.�
�Locate� cutting� unit� stop� brackets� and� thumbscrew� (D� &� E�
�of� Fig.� 4).� Depending� on� size� of� assembly� choose�
�7.�
�8.�
�Push� platen� back� into� place� using� the� side� bar.�
�After� installing� the� stop� bracket,� position� the� armature�
�stop� bracket� accordingly.�
�(Black� for� 14-50� position� and� Silver� for� 68-100� position.)�
�Stop� brackets� are� installed� using� the� thumbscrew�
�(A� &� B� of� Fig.� 2).�
�of� the� press� back� in� an� upright� position.� Tighten� the�
�thumbscrew� (C� of� Fig.� 2)� to� hold� it� in� place.�
�9.� Located� at� the� back� of� the� press� is� a� silver,� dowel� shaped�
�shuttle� stop� (D� of� Fig.� 2).� Set� shuttle� stop� for� appropriate�
�connector� pin� count.�
�10.� Locate� the� shuttle� block� (C� of� Fig.� 4)� and� install� fixture�
�unit� (Fig.� 14)� on� the� guide� pins.� Push� the� release� buttons�
�on� the� front� of� the� fixture� unit� to� open� the� grooved� plates.�
�11.� Locate� the� gauge� block� (F� of� Fig.� 4).� Height� adjustment�
�can� be� accomplished� by� placing� the� gauge� block,� narrow�
�side� down,� in� the� fixture� unit� between� the� two� grooved�
�plates.� Close� plates� manually� by� squeezing�
�them� together.�
�B�
�A�
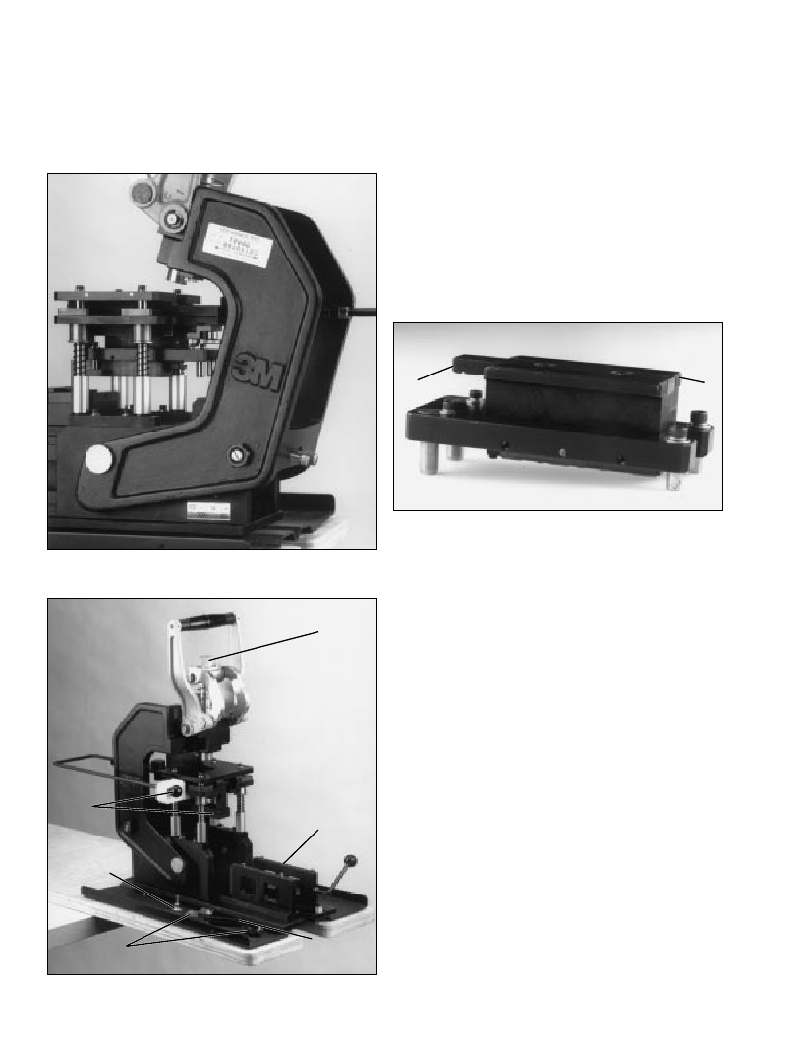
�5�
�Figure� 5.� 10961� Cutting� Unit�
�Figure� 3.� Press� leaned� back�
�B.�
�Side� bar�
�A.�
�Height�
�adjustment�
�knob�
�3�
�12.� Push� shuttle,� with� fixture� unit� and� gauge� block,� away�
�from� the� operator� to� the� rear� of� the� press� until� it� stops.�
�13.� Pull� the� press� handle� down,� toward� the� operator,� until�
�the� platen� contacts� the� gauge� block.�
�DO� NOT� FORCE� HANDLE.�
�14.� Adjust� the� silver� knob� at� the� top� of� the� press� (A� of� Fig.� 4)�
�by� hand� until� the� platen� lightly� contacts� the� gauge� block.�
�Lift� press� handle� up� and� adjust� the� silver� knob�
�approximately� another� one-half� turn� tighter.� Pull� handle�
�down� again.� It� should� lightly� lock� in� place� when� fully�
�depressed.� The� platen� should� apply� enough� pressure�
�on� the� gauge� block� and� shuttle� to� prevent� them� from�
�moving� when� trying� to� slide� them� out.�
�15.� Height� adjustment� should� be� checked� periodically.�
�Fixture� Unit� Adjustment�
�knob� &�
�platen�
�C.�
�Shuttle�
�block�
�Once� the� size� of� the� connector� to� be� assembled� has� been�
�determined� the� 10962� Fixture� Unit� requires� some� adjustments.�
�E.�
�Thumbscrew�
�D.�
�Stop� brackets�
�F.�
�Gauge� block�
�1.�
�2.�
�Select� the� correct� connector� stop� (14,� 20,� 26,� 36,� 40,� 50,�
�68,� 80� or� 100� position;� B� of� Fig.� 14)� for� your� application.�
�Locate� the� yolk� shaped� cover� plate� (A� of� Fig.� 14)� and�
�thumbscrew� at� the� top� of� the� fixture� unit.� Remove�
�and� set� aside.� Close� fixture� unit� grooved� plates� by�
�manually� squeezing� them� together.�
�4�
�Figure� 4.� 10960-2000� Hand� Press�
�2�
�相关PDF资料 |
PDF描述 |
|---|---|
| OPTL-3-MSL | TRIPLE MICRO SUB-LENS |
| OPI-O1011 | LENS BASE MOD SPOT NICHIA 11DEG |
| OPIO-1-011 | SPOT BASE MODULE 11 DEG |
| OPX-P1SPOT | CREE XP ADBACK OPTIC SPOT |
| OPX-P1SDIF | CREE XP ADBACK OPT FRSTD SPT |
相关代理商/技术参数 |
参数描述 |
|---|---|
| 1096100000 | 制造商:Weidmuller 功能描述:SL 7.62HP/09/90LF 3.2SN OR BX |
| 109611 | 制造商:未知厂家 制造商全称:未知厂家 功能描述:SUPERKLEMMEN NR 1 5ST Inhalt pro Packung: 5 Stk. |
| 1096110000 | 制造商:Weidmuller 功能描述:SL 7.62HP/10/90LF 3.2SN OR BX |
| 1096120000 | 制造商:Weidmuller 功能描述:SL 7.62HP/11/90LF 3.2SN OR BX |
| 10-961-2-05 | 制造商:Concord Electronics Inc 功能描述: |
发布紧急采购,3分钟左右您将得到回复。